
RespondAR® is an augmented reality, UAV pilot app providing geospatial AR overlays on live drone video. These overlays provide enhanced situational awareness to end users.
Smarter Cameras
RespondAR® blends geospatial metadata with live video frames to produce georeferenced video.
Leveraged Assets
RespondAR® allows First Responders to leverage live video with a geographic context.
Situational Awareness
RespondAR® provides enhanced situational awareness to Pilots in Command, Sensor Operators and Remote Video Observers.
Mission Assured
RespondAR® is powered by combat-proven technology, SmartCam3D®.
Situational Awareness for First Responders
Compatibility
RespondAR® is an iOS drone pilot application that leverages the DJI SDK. This provides the same functionalities pilots are used to, including: Auto Take-Off and Auto-Land, multiple FPV modes, full camera control and Return to Home, making operations user-friendly.
Features
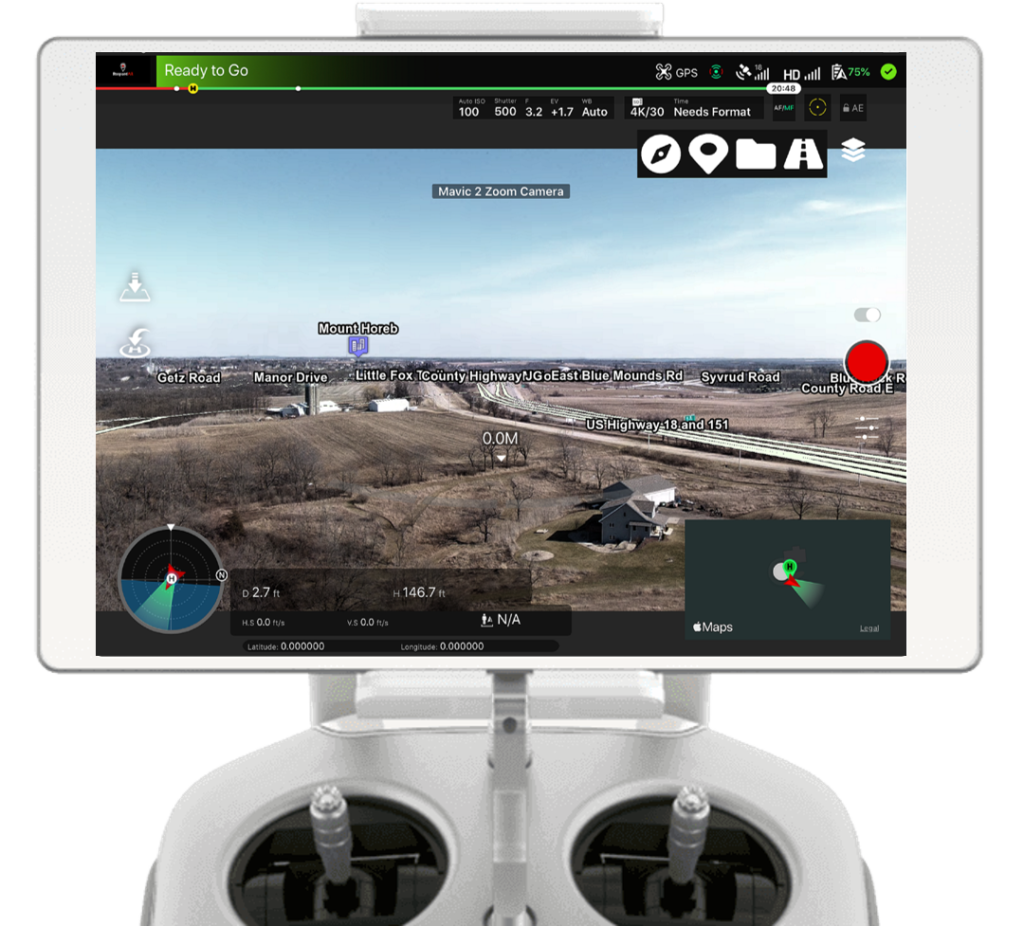
RespondAR provides real-time augmented reality overlays of geographic information on live drone video. These overlays are superimposed onto the live video stream providing operators with enhanced situational awareness. Please see the list of app features below.
RespondAR is built on the DJI SDK, providing users with a familiar, user-friendly flight experience. Common controls and displays including Auto-Take-Off and Land, flight telemetry, camera settings, compass calibration, controller calibration, battery and GPS status and more are located in their usual areas when compared to the standard DJI Go and DJI Go 4 Apps.
RespondAR is designed to promote enhanced situational awareness among end-users. One way this is accomplished is by supplementing the live video display with GIS overlays while also decluttering the view of potentially distracting data displays and control buttons.
To maximize the user’s view of the live video, users can tap the RespondAR icon on the top left corner of the app to declutter the entire screen and only display the information most relevant to their mission set, the live video feed and supplemental GIS data.
The primary aesthetic controls for the GIS augmented reality overlays within RespondAR are located under the Overlays Menu button. Tapping this icon will open a panel with 4 sub-menus for street overlay control, custom KMZ overlay control, Point of Interest Overlay control and general overlay aesthetic control.
When using the street overlay control menu, users have the option to turn road and street lines on and off as well as road and street names on and off. Users also have the option of enabling or disabling both the lines and the labels at the same time using the enable or disable all buttons.
When using the KMZ Import control menu, users have the option of importing their own, custom GIS information via KMZ file, to be displayed on the live video. To use this feature, a user will first have to create a KMZ file within Google Earth. To do this, open Google Earth, add a placemark, or multiple placemarks, and save the single or multiple locations as a place. This is done by right clicking the entity, selecting Save as Place and then ensuring the file is saving as a KMZ. From there, the user can tap the Import button within the KMZ Import Menu and then browse to their KMZ file to have it display in the video. Additionally, if adding a KMZ with multiple points of interest, each point of interest will populate a list, allowing the user to enable or disable specific points of interest. Additionally, the user also has the option of enabling or disabling all the points of interest simultaneously.
When utilizing the Point of Interest control menu, users will be able to control specific point of interest types with significant granularity. A list of all Point of Interest types are displayed and users can individually enable or disable the specific POI types they would like to see overlaid on the live video. Further, users are able to enable or disable all POIs with the touch of a button at the top of the menu. With Point of Interest display control, users can benefit from enhanced situational awareness by displaying only those points of most relevance, and declutter the display of unneeded or otherwise distracting overlays.
When a user wants to manipulate the overall aesthetic of their GIS augmented reality overlays, they can utilize the Overlay Aesthetic and Offset Sliders Menu. Within this menu are a variety of sliders that allow the user to modify their overlays to match the look and feel desired. The first series of offset sliders adjust reported metadata from the aircraft. These sliders include an offset for heading, which effectively rotates the overlays within the video to match the environment below, an offset for Vertical Field of View, which effectively shrinks or expands the overlays within the video to match the environment below, an offset for altitude adjustment, which effectively raises and lowers the overlays within the video to match the environment below, and an offset for pitch, which effectively tilts the overlays within the video to match the environment below.
The accuracy of overlay placement within the video is tied to the accuracy of the metadata being reported from the aircraft. For this reason, offset adjustments must sometimes be utilized to provide a clean look and feel. Offsets made during the flight will hold for the duration of the flight. Often, once these offsets are set at the beginning of the flight, no further adjustments need to be made throughout the flight.
Additional aesthetic sliders are also included under this menu. These sliders provide for control of street label style, overlay transparency and label density. The street label slider gives users control of how street labels are displayed. The two options provided are Flat and Billboard. Adjusting the slider to “Flat” lays street names flat to the earth. This option is best utilized when flying at higher altitudes or when viewing an environment with a NADIR or near-NADIR viewing angle – in other words, when looking straight down or near-straight down from the aircraft. The second option is Billboard, which will stand the street labels up and allow for better viewing and enhanced readability when viewing street names at lower altitudes or when the viewing angle of the camera is less than 90° – in other words, when more of the horizon can be seen within the video frame.
There are also three sliders for overlay transparency, including for: Street Lines, Street Names and Points of Interest. These sliders allow you to adjust the transparency of each of these GIS entities.
Finally, there is also a street label density slider. This slider allows you to adjust the density of the street labels. When you increase the label density, the number of times the street name is repeated across a given stretch of road, increases. This is best used if you are trying to identify a road within the video but due to your aircraft’s position and viewing angle, the street label is just off the screen. By increasing street label density, you can have the name repeat and populate the area of blank road that is within your first person view.
The RespondAR app allows users to interact with their live video feed in similar ways to how they would typically interact with a 2D map display. This includes the ability to drop pins to mark points of interest. To drop a pin and mark a location in RespondAR, simply double-tap the location in the video you would like to drop the pin. From there, users will be prompted to assign a name to the point. After naming the point, the icon will hold in the correct position geospatially, but within the live video frame. Additionally, the geocoordinate associated with the point will be displayed below the aircraft telemetry data located on the bottom left-hand side of the app window.
Reverse Geocoding is one of the most powerful capabilities within RespondAR. Reverse geocoding is the process of converting geographic coordinates into a human-readable address. This can be extremely useful when flying over a scene, particularly if it is unfamiliar to the pilot or sensor operator or when address information must be relayed to cooperating personnel.
To utilize the reverse geocoding capability, users simply need to tap four times on the location within the video they would like to pull address information for. RespondAR will immediately grab the geocoordinate associated with the point and convert it to a human-readable address.
RespondAR has been designed to provide operability even in low-connectivity or no-connectivity environments. While users will lose their reverse-geocoding capability when using RespondAR offline, all other features are still available so long as the user packs for their flight by caching the necessary map and elevation data needed to display the GIS augmented reality overlays. This is done from the home page.
To cache map and elevation data, launch RespondAR while disconnected from the drone. The RespondAR home page will pop-up. Next, click the globe icon on the top right of the screen. Next, navigate to the region of the map you would like to cache. Tap and hold your finger near the center of the operating area. A green circle will appear. If you don’t see it, zoom out to bring the entire circle into view. Next, use the slider on the top right to adjust the size of the area of operation. When you have the area of operation set, tap “Done.” At the bottom of the home page you will then see a status message showing the number of files remaining to be cached. When the download is complete, you will be able to operate within the geographic area you designated, while offline.
Pricing
RespondAR® is available for free on the App Store. Monthly or Annual In-App Subscriptions are available and provide additional capabilities. Subscription Tiers include Basic and Pro. To learn more about the features included under each tier, please see the price list below. For a limited time, enjoy a 30 Day FREE Trial to any Subscription level for first time subscribers.
BASIC
Enhanced Features-
No Ads
-
DJI-Compatible
-
Points of Interest
-
Overlay Adjustment
-
Street Vectors
-
Street Names
-
-
-
-
-
-
-
PRO
Professional Features-
No Ads
-
DJI-Compatible
-
Points of Interest
-
Overlay Adjustment
-
Street Vectors
-
Street Names
-
Street Label Style
-
Map Data Caching
-
Reverse-Geocoding
-
Custom User Points
-
Location Sharing
-
Custom KMZ Import
FREE
Try It Out-
No Ads
-
DJI-Compatible
-
Points of Interest
-
Overlay Adjustment
-
-
-
-
-
-
-
-
-
BASIC
Enhanced Features-
No Ads
-
DJI-Compatible
-
Points of Interest
-
Overlay Adjustment
-
Street Vectors
-
Street Names
-
-
-
-
-
-
-
PRO
Professional Features-
No Ads
-
DJI-Compatible
-
Points of Interest
-
Overlay Adjustment
-
Street Vectors
-
Street Names
-
Street Label Style
-
Map Data Caching
-
Reverse-Geocoding
-
Custom User Points
-
Location Sharing
-
Custom KMZ Import
Tutorial Video
RespondAR® is loaded with features ranging from Pilot App capabilities to Reverse-Geocoding and Custom KMZ Importing. To utilizing these features, please take a second to check out our Tutorial Video, which explains how to use each of the features included in the RespondAR® application. If you still have questions after watching this video, please check out our FAQ section below or feel free to contact us.
Frequently asked questions
RespondAR is a Drone Pilot application designed for use with small Unmanned Aircraft Systems. The app blends GIS data with live video frames to produce georeferenced video. From there, GIS augmented reality overlays are superimposed on the live video feed. These overlays are similar to what you’d see in Google Maps, including: Road/Street Names, Points of Interest, etc.
RespondAR is currently compatible with all modern DJI platforms including the Inspire lineup, Phantom lineup (Phantom 3 and Newer), Mavic lineup, Spark and Matrice Series.
RespondAR is currently supported on iOS.
RespondAR uses industry-leading Augmented Reality (“AR”) software and is powered by Rapid Imaging’s proprietary SmartCam3D® Augmented Reality Rendering Module. SmartCam3D® is currently deployed with US Army tactical unmanned systems, embedded within the Universal Ground Control Stations used to fly the Shadow and Gray Eagle UAV platforms.
RespondAR is currently available on the Apple App Store.
Geographic Information System Augmented Reality Overlays or GIS AR Overlays are map icons and linework that are superimposed on a live video feed. Unlike traditional augmented reality, Rapid Imaging’s AR Overlays have a geographic context and can be associated with geographic points in the real-world.
KMZ Import support allows users to upload their own KMZ files with designated Points of Interest. This is useful to users who would like to display custom GIS points.